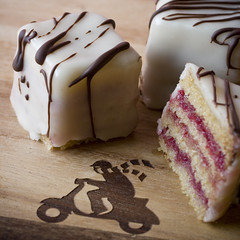
Petits Fours
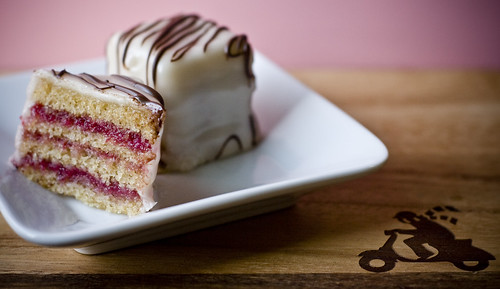
If you’ve been keeping up with my blog for a while, you know that I like all things miniature. Especially desserts. I’m surprised it’s taken me this long to make petits fours. They’re the perfect mini dessert; a tiny layer cake, dipped in poured fondant and individually decorated. Bite sized individual cakes? Yes, please. Who on earth could say no to these?
Sometimes people use the term petit four generally. They might be referring to any small dessert, even a simple piece of chocolate. The majority of the time, however, they are referring to these fancy miniature iced cakes. They’re typically cube-shaped, though you’ll sometimes see diamonds, rectangles, and cylinders. The iced versions are technically called petits fours glacés, but rarely to people get so specific.
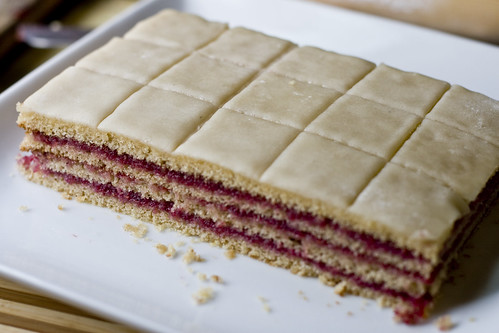
You can just dip a cube of cake into icing and call it a day (or rather a petit four), but the most traditional versions are layered with jam, soaked with liquor syrup, dipped in poured fondant and decorated. Pain in the ass? Yes. Worth it? Hell yes.
 Let’s talk for a minute about the components of this type of petit four. The cake is typically a génoise, which is a French cake named after a city in Italy. Génoise cakes traditionally do not include any chemical leavening all, but instead trap air in the batter by vigorous beating before baking. In normal génoise recipes, eggs help to keep the air in the batter. In the oven, the heated air expands and causes the cake to rise. This recipe contains no eggs, however, so chemical leavening is used. I used Bryanna Clark Grogan’s recipe, but any fairly dense cake recipe (like a pound cake) will work for this. A tight crumb will make your life easier when slicing the petits fours. Make sure to visit Bryanna’s page, though; she has wonderful tips on making fancy vegan cakes, a nice buttercream recipe, and lots of photos.
I iced my petits fours with poured fondant. There are two types of fondant, rolled and poured. Before I started researching for this, I only knew of rolled fondant, which is the really neat sugar-dough stuff that is often used to decorate wedding cakes. Poured fondant is similar to rolled, but instead of rolling it out to use it, you pour it while it’s in a liquified state. Makes sense to me. It’s easy to make, but it does require a candy thermometer. You need to boil sugar, corn syrup and water until the soft ball stage, but we’ll get to that later.
Once you have the cake and the fondant figured out, give yourself a break and buy a jam, any jam, for the filling. Sure, you can pick berries and make your own filling, but store-bought jam works beautifully in this and saves you a step or five. You can also soak the cake with a liquor syrup if desired. I never do this for my cakes, but if you want to, use a ration of 1:1:1 water, sugar, liquor. In a saucepan, dissolve sugar completely in the water. Remove from heat, add liquor, and allow to cool.
Now you’ll also need a few tools. A candy thermometer ($10 for a standard one, $30 for an electric one that has programs and alarms and such), a jelly roll pan (aka cookie sheet with sides), a food processor, a large serrated knife, parchment paper, a rolling pin, and a cooling rack.
Right. Are you ready?
Petits Fours
Makes 30 1 1/2″ Pieces
1 Cake recipe, below
1 Fondant Recipe, below
1 1/2 Cups Jam, warmed (raspberry is nice!)
1/2 Cup Marzipan
Powdered Sugar, for rolling out marzipan
Melted Chocolate, for decoration, optional
Bryanna Clark Grogan’s Génoise
Makes 5 Cups of Batter
2 1/2 Cups plus 2 T. pastry or cake flour
1 1/2 Cups Granulated Sugar
2 tsp Baking Powder
1/2 tsp Baking Soda
3/4 tsp Salt
1/4 Cup plus 2 Tbs Earth Balance
2 Tbs Fresh Lemon Juice and Zest of 1 whole Lemon
1 Cup Water
3/4 Cup Soy or Rice Milk
1 1/2 tsp Vanilla Extract
1 tsp Pure Lemon Extract
Preheat oven to 350º F.
Brush a Jelly Roll Pan (half sheet size, 12 x 17 x 1″) with oil. Use two sheets of parchment paper to cover the bottom, overlapping each long edge of the pan. This will allow you to lift the entire cake out of the pan without breaking it. The oil helps the parchment stick to the pan, so it doesn’t slip while pouring in the batter.
Mix the dry ingredients together in a large bowl. Add Earth Balance, water, and lemon juice and beat well (with an electric mixer if available) for about a minute. Add the remaining ingredients and beat again. Pour the batter into the lined jelly roll pan and bake for 25-30 minutes, until the edges are golden brown and the top is lightly browned, and the center springs back to your touch. Allow to cool in pan until just warm.
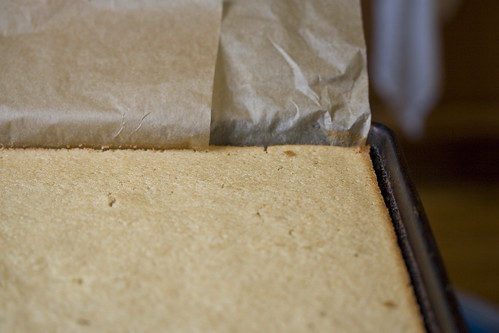
Gripping the parchment in the center on either side, gently lift the cake out of the pan and place it on a large cutting surface. It should look like this:

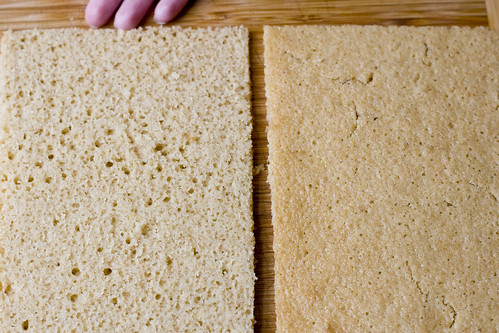
With a serrated knife, cut off all the caramelized edges (eat them!), and quarter the cake. Below is a photo of one of the four trimmed quarters:

Alright, here’s the first tricky part. With a large serrated knife, cut each quarter in half horizontally. You can take as much time as you need. Cut a little bit at a time, making sure your knife is being held level. Ideally you want two even layers.

Carefully separate the layers. You should now have this:
Spread the warmed jam on one of the sliced cake quarters. You don’t need a ton of jam, just enough to color the cake. You should still be able to see the cake through the jam.

Begin stacking, alternating cake and jam, until you have four layers of cake. You should have enough cake to make two stacks, each stack containing four layers of cake and three layers of jam. Trim the edges if needed.
Divide the marzipan in half. Knead it until it softens, then roll each chunk out separately using powdered sugar to prevent it from sticking.
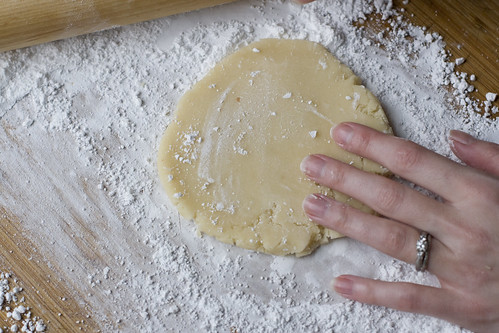
Roll it out until you get a thin, even sheet that is larger in all directions than your layered cake.
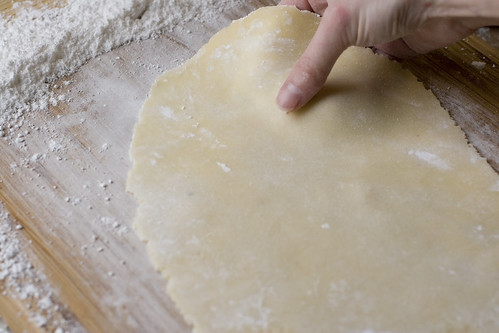
Brush one side of the marzipan with water to make it sticky, then place it on top of your cake, sticky-side down. Trim the edges off with scissors. Repeat for the second rectangle of cake.
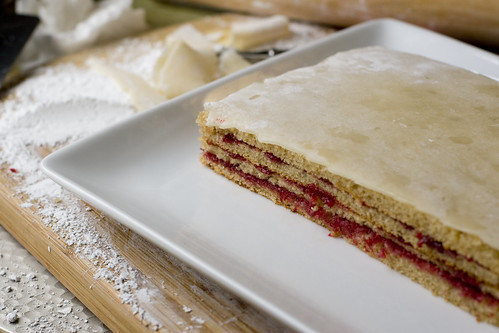
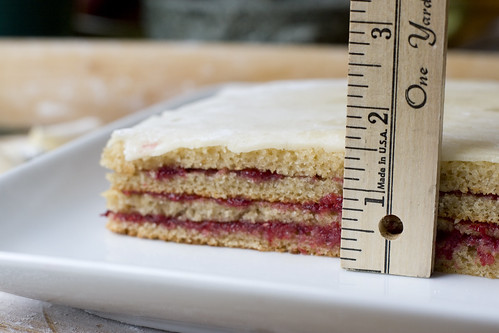
The cake is now ready to be refrigerated. It should be approximately 1 1/2 inches high. Cover it in plastic wrap and refrigerate for several hours or overnight; this helps the jam set up and will help the cake stay together when you cut it into petit fours.
Now the cake has been refrigerated overnight!
Using a ruler, score the marzipan with 1 1/2 inch grid as a cutting guideline. Each rectangle of cake should have 15 full squares, and a little extra that you can cut off and eat. Here’s the scored, trimmed cake:
Keeping your knife as straight as possible, use long, sawing strokes to cut the cubes. Cover with plastic wrap to prevent the cake from drying out.

Prepare your fondant:
Helen Fletcher’s Poured Fondant
2 1/2 Cups Sugar
1/2 Cup Water
1/4 Cup Corn Syrup
Written directions copy and pasted directly:
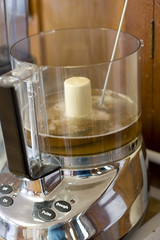 Heat sugar, water and corn syrup to the soft-ball stage (238°F; 114°C). Pour into the food processor fitted with the steel blade. Wash the candy thermometer well and reinsert into the syrup. Let the syrup cool undisturbed in the workbowl to 140°F (60°C), about 30 minutes. Remove the thermometer.
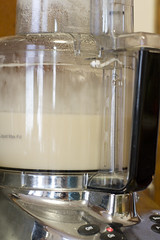
Add any coloring or flavoring (vanilla, almond extract, etc.) and process 2 to 3 minutes, until the syrup completely converts from a glassy syrup to an opaque paste. When thoroughly cooled, store sealed at room temperature for 24 hours. Use or refrigerate for later use. [I just want to add: It will harden once completely cooled, simply microwave to liquify. It is warm enough to use for the petits fours immediately after processing.]

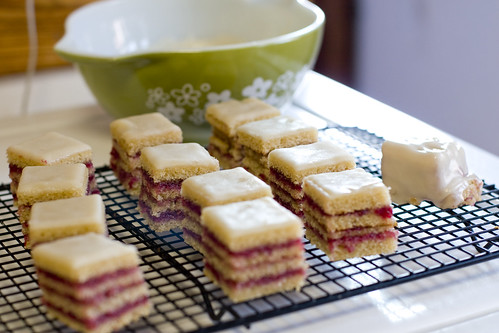
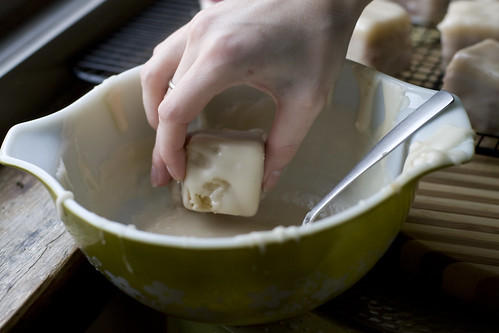
Place your petits fours on a cooling rack and pour your fondant into a small bowl. You’re ready to ice them!
In my opinion, icing is the hardest part. You need to keep your fondant warm and melty, and you’ll notice that it starts to set up fast. Give it a stir with a spoon before you dip each piece, as this will break any skin that has formed on top of the fondant. If it gets too thick (thinner is better), pop it in the microwave for 30 seconds and try again.
Start with the ugly ones, that way if you mess up on the first few you won’t be as sad. Hold each cube so your forefinger is on the top of the cake (touching the marzipan) and your thumb is on the bottom. Dip all four sides.
Place the dipped petit four on the rack. Use a spoon to ice the top.
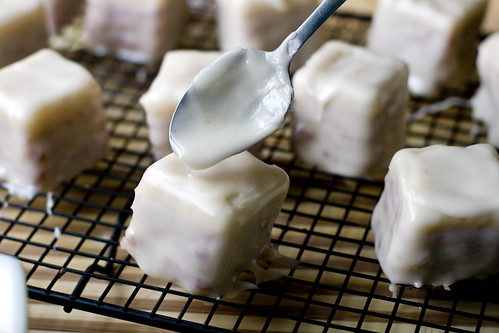
Let the petits fours set. You may need the help of a sharp knife to remove them from the rack once the fondant is hardened. I drizzled some melted chocolate over them to decorate, but you can decorate them anyway you want. Piped buttercream, molded marzipan, whatever makes you happy.

They look wonderfully delicious! Great job!
Oh my gosh, thank you for this post! I’ve been wanting to make petit fours four ages but haven’t been brave enough. I”m sure going to now!
Oh, my! You are wonderful. Truly, truly wonderful. The petit fours are gorgeous, but the step-by-step how-to is really marvelous. Thanks so much for this post! I can’t wait to spend an afternoon trying my hand at these little delights :-) Bravo, Lolo!
I’ve never had one of those cute little cakes before (allergic to eggs); I just might weep.
Of course, I’m somewhat intimidated by this recipe, but it’s worth a shot.
Thank you, thank you.
mmmppphhh. wow. miam.
Those are gorgeous! I love the idea of filling them with jam.
What a work of art! So pretty and dainty. Wow.
cool!!!! these look like a lot of fun to make and eat!
Oh my god. Gorgeous.
A work of art! I’m trying desperately not to read blogs that feature desserts since I’m determined to lose some weight, but this post just fascinated me. I had to read to the very end. Your patience in making these gorgeous cakes is amazing!
effing incredible. you are always one to inspire.
As always, beautiful foods. Truly art, more than I want to tackle at this point, but I do admire it.
Superbes !!!!
Bizzzzzzzzzzz
♥Barbichounette♥
Oh my goodness. I am speechless!
These were awesome.
oh my god.
You have more patience that I could ever have!
These are gorgeous!
SO Beautiful! I am ever growingly fond of this blog!
I went to a baseball game with my fiance, his boss and his boss’ wife. Mrs. Boss brought petite fours into the ballpark and since it was a few days after my fiance’s birthday, she stuck a candle in one of the petit fours. It’s the perfect amount of cake, and you really do eat it slowly and savor it because it’s so small!!
I cannot wait to re-create this… it’s a great idea for a picnic!
I am a huge petit four lover, and I have to say I have never seen such thorough and beautiful NON-vegan instructions as your amazing VEGAN steps!! I’ve made so many disasterous attempts with the standard version – attempting to convert them to a tasty vegan recipe seemed out of the question. You make it look easy and delicious. I can’t wait to try again! What a treat!!! Thank you thank you!
WOW!!!!!
What’s with that ridiculously cute little Vespa guy in the first two shots? Is it a sticker, or did you woodcut that onto the table?
Oh and the petit fours look amazing.
Wow, those are so beautiful!! And what a wonderful, easy to follow tutorial. Now I just need to find the patience to make them! Thanks so much :-)
Stacy – The little vespa guy is woodcut/lasercut/burnt or something directly into the cutting board. My sister got it for me for Christmas, but unfortunately I don’t know the brand or where she bought it!
Absolutely gorgeous! I have been wanting to make petit fours for the *longest* time, so now I will have to when I get some spare time. Thank you so much for this tutorial!
Wow! I was exhausted (in a good way!) simply after looking at all of the pics showing the steps required to make petit fours…
You’re quite dedicated – those look great :)
P.S. I, too, have a soft spot for miniature desserts. They’re completely irresistible, aren’t they?!
there are no words……
oh…my…goodness….I need to have some of these lol!
Thank you. thank you thank you for this post. I have been wanting to make petit fours and didn’t really know where to begin. You have done a fantastic job explaining. Again thanks!
A work of art! i love the tutorial.
WOW.
The candy thermometer scares me, but for this I might be able to handle it.
Amazing!
Those are pure elegance!
This is so Anne of Green Gables!! They are adorable!
whoa! I’d never thought about MAKING petit fours. I’ve always just felt sorry for myself that since going vegan I can’t buy them.
Let’s discuss how jealous I am that you were clever enough to find a fondant recipe from a post-food processor source. If you’re curious what happens if you use an older, hand-mixed fondant recipe, check out my candymaking photoset on flickr. Yikes.
Thank you!!! So I plan on trying to make these, maybe around Valentines Day. Just one question- how on earth do you pronounce ‘petit fours’?
When I used to make thin cake layers I used to stick toothpicks on the sides, parallel to the plate , and then wind dental floss over and under the toothpicks and then pulling to slice. the layers. No knife, and good thing, too, as I am somewhat klutzy and ended up slicing my hand.
My sons will really enjoy these!
you rock!!!can’t wait to try these out-
thanks!
These look awesome – good for you for all that work.
Hi VY…these are gorgeous. What a load of work putting the tutorial together. It’s perfect…& must have been as much work at the petit fours themselves! WOW!!
WOW, those are way too pretty to eat!
vegan petits fours = heavenly
as usual, you are my hero!
i’ve been trying to perfect petite fours for a baby shower this sunday. this posting helps me SO much. now i can experiment with your recipe as well!
see my trials here:
http://www.sugar-shock.blogspot.com/
thank you, thank you, thank you!
Oh, oh, OH how I love petits fours! Yours look divine, and the step by step instructions and photos are wonderful. Saving this one to del.icio.us until I gather up enough courage and time (and self control so I don’t devour them all at once, LOL) to make my own. Thank you!
totally AWESOME!! I really love your blog, and every new post gives me a new inspiration for cooking ;) Keep thumbs upp for this!
AARGGH!! NO, I do a great writing-mistake in my previous message! I`m sorry because I used that term “awful” now I realized it means something like “terrible”!! I`m reslly sorry I really don`t meant that.. My skils with writing english language are littlebit “limited”..Eh. I must correct that mistake and say those bakings are wonderful!
oh, no … I noticed I haven`t writed anything like awful..I don`t remembered I write awesome.. I`m sorry because this dorking… Stupid me , I just quailed much.. But happy new year for you and greetings from far-upp North!
This is a great blog, really cool recipes!
Wow! Those are beautiful! I’ll have to buck up some baking courage and try these some weekend! Thanks for sharing! :)
Miss Lolo child!!!
You are one talented young gal. This is my first time on your website and I am flabbergasted at the beauty, creativity and thoughtfully concise intructions.
May I ask what camera do you use to capture such delicious images?