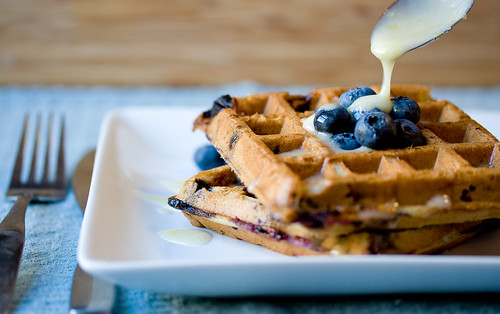
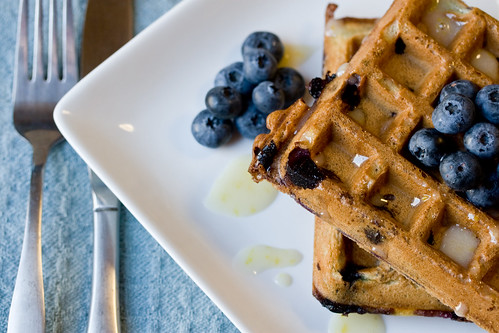
Posts filed under 'cookbook'

Fiddlehead ferns are one of spring’s most elusive goodies. The are available for about three weeks in May (as in right this second), and are generally harvested in the northeastern United States. A fiddlehead is the tip of an unfurling Ostrich Fern frond, quickly snapped off with the flick of the wrist by professional foragers in the wild. If you see some growing in the woods near you, take care. There are many other ferns that resemble the Ostrich Fern, some of which are considered to be carcinogenic, like the Bracken Fern. Unless you have a guide with you, leave the collecting to the professionals and pick some up at Whole Foods. They cost $6 a pound in Boston.
Their flavor is mild, and perhaps most closely resembles asparagus, and asparagus is the best substitute for the ferns. Some also say they are similar to green beans and artichokes. They are pleasently crunchy with a nutty, slightly bitter bite, which is why you’ll see so many fiddlehead recipes calling for butter and salt. Treat the fiddleheads like asparagus tips and you can’t go wrong. If you really want a treat, serve them up with some morel mushrooms; their season coincides almost exactly with the ferns and they pair well.

There are a few things you need to know about preparing fiddleheads. Most importantly, eat them immeditely. Fiddleheads do not keep well, so you should try to use them the same day you buy them. You can keep them covered for a few days in the fridge, but their flavor diminishes quickly and they will spoil soon after that. Do yourself a favor and eat them as soon as possible.
To prep the fiddleheads, any leftover “silk” should be removed. The silk is a thin, brown, papery covering that resembles a peanut casing. Most of this is taken off before distributors put them up for sale, but there are always remnants that need to be removed. You can rub it off with your fingers; I prefer to do it in a bath of cold water. Rinse them in a bowl, gently agitating them with your fingers and pouring off the water until it is free of particles. Drain well and pat dry.
People argue about how you’re supposed to cook fiddleheads. Health officials recommend that you boil them for 15 minutes or steam for 10-12 before eating. Why? Because fiddleheads have been associated with certain unpleasant G.I. sicknesses. However, the same article references three sources that claim that Ostrich Fern fiddleheads are safe to eat in any state, raw or cooked.
Personally, I have always lightly cooked my fiddleheads and I have never had an issue. If I had to boil them for 15 minutes to eat them, I wouldn’t eat them at all! The delight of fiddleheads is their delicate taste and toothsome crunch – boiling them for that long would destroy all that I love about this tender green. You should do whatever makes you feel comfortable.

May 25th, 2007

I have some news for you all!
On May 23 I will be in New York City helping Isa Chandra Moskowitz cater a dinner hosted by New York Magazine! It is part of their Secret Kitchen event, which means I can’t share too much information, but here’s what I can say:
When: May 23rd, from 7:30 – 11:30 PM
How: Tickets available here
Where: To be announced 24 hours before event to ticket holders
Who: Isa Chandra of the PPK, and, uh, me!
What: 8 course gourmet dinner, “Think Asian Bat Mitzvah!” says Isa.
Entertainment: Man Man
I’m super excited to be a part of this. We are expecting 300 people! Tickets are listed as currently sold-out, but there is a chance more will become available tomorrow, Tuesday May 15th. Keep checking the link above if you want to go! Hope to see you in New York!
Oh, and if you’re wondering, the picture is a new recipe for my cookbook. It’s grilled pear and candied walnuts, served over cabbage that has been tossed with a lemon brown sugar dressing.

May 14th, 2007

I love trying new things. There has been much talk of crumpets over on the PPK forums, so this morning I did some research, threw a batter together, bought some cooking rings while it was rising and made crumpets like there was no tomorrow.
Crumpets are like a cross between a muffin and injera (a spongy, Ethiopian pancake that’s covered in tiny holes). They spend the majority of the time cooking slowly on one side, and the batter is contained within rings until it’s set. The yeast produces bubbles in the dough that make little holes when they escape, giving crumpets their characteristic look and texture.
I sprinkled these with cinnamon and sugar and put them under the broiler for a couple minutes; it was such a lovely breakfast! You can also eat them toasted with earth balance and jam. A special thanks to Amanda for the amazing jams she gave me!

You’ll have to wait until the cookbook comes out for the recipe. Rest assured that my testers have pledged to try it out and make sure that it’ll be worth waiting for! If you want to try something similar, head over to Cherie’s to take a look at her fantastic English Muffins. While the end result is different, the process is similar!
May 11th, 2007

I’ve been busy creating recipes for my cookbook project, but I haven’t forgotten about you!
On Thursday Stewart and I are taking our honeymoon to Belize, and since I’ll have access to a kitchen, I’ll hopefully have some fun tropical recipes to share while I’m there.
In the meantime, here is a sneak peak of some of the things I’ve been working on!

Lemon Cranberry Muffins

Picnic Sandwich

Pasta Gremolata with Sundried Tomatoes and Garlic Breadcrumbs
The recipe for the Pasta Gremolata will be available in the next online edition of Herbivore Magazine, so get yourself a subscription already!
April 24th, 2007

I’ve been running around trying to get a bank of recipes together for my cookbook project. I made these today, and they would have been so good had they not melted my mouth. Apparently jalapenos range from 2,500 to 10,000 scovilles, and I guess the peppers I picked up were closer to the latter. I took one bite and had to fly into the kitchen to rip a chunk of bread off the nice loaf that Stewart bought earlier today.
I ended up eating the breading off, and scooping the filling out with my fingers. Not very good table manners, but I wanted to eat them! Next time I make these I should test the heat of the peppers before I begin filling them.
I’m saving the recipe for the book/zine/whatever, but I can give you some tips on how to fill them:
Use the tip of a sharp paring knife to cut a little door out of the side of the pepper. Some recipes say to cut the entire pepper in half, but those recipes have sticky cheese in the middle to help the pepper glue itself back together.
Again, with the tip of your knife, try to remove as much of the seeds and membranes as possible. They sort of hang down in the pepper in a cone, so if you cut the top and slide your knife down the sides, it should come out without too much fussing. Remove any membranes from the little door, too, since you’ll be using that piece.
Oh, and leave the stems on!

If you have a pastry bag, use that to fill the peppers. If not, a ziplock with the corner cut off will work just as well. You want to put enough filling in so that the door sticks to the pepper when you put it back in place. If a little of the filling squishes out, just wipe it off and eat it, as long as no one is watching.
They should hold up well enough while you’re covering them in batter, and once they’re fried they’ll be sealed shut. I need to go find some peppers that don’t want to kill me so I can make this again.
April 21st, 2007
Next Posts