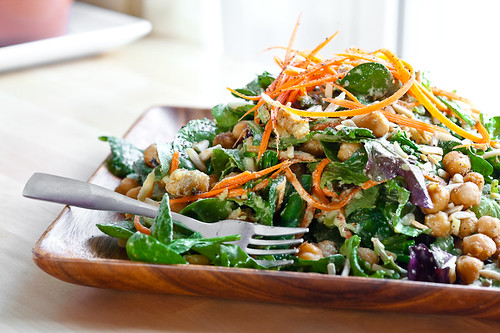
Avocado Wasabi Salad
Yes, I know. It’s a salad.
Who wants to go to a vegan website and see a recipe for salad? I keep salads to an absolute minimum around here. So when one does show up, it’s a freakin’ delicious salad.
And this one is definitely freakin’ delicious.
I’ve had the idea of an avocado based salad dressing kicking around in my head for the last few days, and an avocado kicking around my kitchen counter. This salad is easy to throw together, and is a great entree salad, or a side salad for a dinner party or some such get-together.
The dressing is rich, and despite the title, is pretty damn tasty even without the added wasabi. You have my permission to leave the wasabi powder out altogether if you don’t like it or can’t find it.
I don’t know if my wasabi powder is old and has lost its kick, or if you need a massive amount of it to make things spicy (anyone with experience want to weigh in?), but this dressing was as mild as the day is long. It added a great flavor, but no heat. You may wish to add in your own wasabi powder slowly, tasting as you go, just in case yours is spicy.
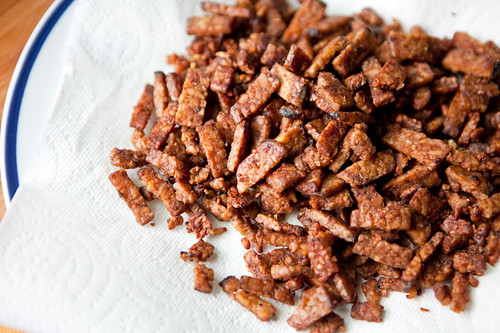
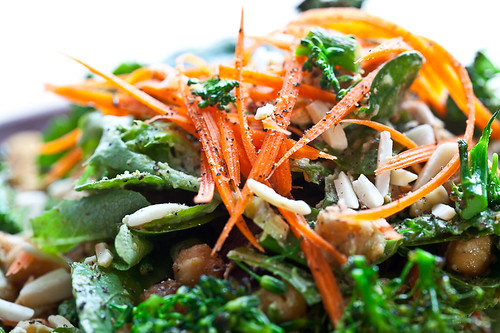
The other ingredients are simple but flavorful as well. Pan-fried wasabi-soy chickpeas, sauteed broccoli, toasted almonds, and shredded carrots. I find this mixture goes particularly well together, adding crunch, sweetness, protein, and color. And they all pair wonderfully with the dressing.
Speaking of the dressing, it’s pretty ugly stuff. This isn’t something you’re going to want to serve on the side for your guests. Toss it with the lettuce and then serve it. Just trust me on this one. You’ll see when you make it.
Avocado Wasabi Salad
Serves 4-6
Greens of your choice for 4-6 people
1 Carrot, shredded
2 tsp Vegetable Oil, divided
1/2 to 3/4 Cup Broccoli, chopped small
1/3 Cup Toasted Slivered Almonds
1 Recipe Wasabi Chickpeas, below
1 Recipe Avocado Wasabi dressing, below
Fresh Cracked Black Pepper
Wasabi-Tamari Chickpeas
1 tsp Oil
1 Cup Chickpeas
1 tsp Wasabi Powder
1/2 tsp Sugar
1 Tbs Low Sodium Tamari/Soy Sauce
Avocado Wasabi Dressing
1 Ripe Avocado, diced
2 tsp White Wine Vinegar
3 Tbs Hummus, plain or garlic
1 tsp Stoneground Mustard
1/2 tsp Salt
2 tsp Wasabi Powder
1/4 to 1/3 Cup Vegetable oil
Begin by whisking the dressing ingredients together, except for the oil. Whisk until smooth. If your avocado isn’t super ripe, you may wish to blend the dressing in a food processor. Slowly add oil until emulsified and the dressing is smooth, refrigerate until ready to use.
Toast your almonds in a dry pan over medium heat if they are not already toasted. Set aside.
In the same pan, add 1 tsp of oil and add broccoli. Sautee over high heat until the broccoli is beginning to color in spots and is bright green, but still tender-crisp. Sprinkle lightly with salt and set aside.
Add the second teaspoon of oil to the same pan and add the chickpeas. Reduce heat to medium-high. Cook the chickpeas until they are golden on all sides, using a spatula to loosen them as necessary, but don’t worry if they stick a little. Add the wasabi powder, sugar, and tamari and stir well. Remove from pan and set aside.
In a large bowl, add your salad greens. Add the broccoli, 3/4 of the chickpeas, 3/4 of the almonds, and 3/4 of the carrots. Toss with enough dressing to coat. Plate the salad, and garnish the top with the remaining chickpeas, almonds and carrots. Crack fresh black pepper over the top. Serve immediately.
If you are serving the salad later, do not add the dressing until the last minute.
PS – I have a new “like” button down there over the comments if you want to heart a recipe without commenting. :) And if you’re interested in what I’m cooking, and what us in line for the blog, become a fan on facebook.