Lemon Maple Scones with Vegan Clotted Cream
American scones are different than British scones. Up until today, when I pictured a scone in my head, it was triangular, fairly large, dry, crumbly and sweet. And tasty.
Imagine my surprise when I did a google image search and saw photo after photo of things that looked like biscuits. After some research (thank you wikipedia), I realized that British scones are indeed different than their American counterparts. They’re less sweet, smaller, and fluffier–and indeed fairly similar to the US biscuit. I had to make some. And I had to eat them with clotted cream.
 Now, I’ve never had clotted cream. Despite the fact that it’s definitely not vegan, it’s made with unpasteurized milk which is simply unavailable in most areas–it’s actually illegal in 25 states. From what I’ve read, clotted cream is slightly sweet, has a light tang, and is at least 55% fat. It’s usually served on scones for cream tea (tea served with scones, clotted cream and jam), so I decided that I needed to make a vegan version. Like, immediately.
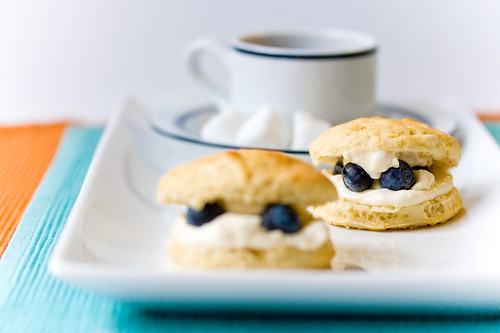
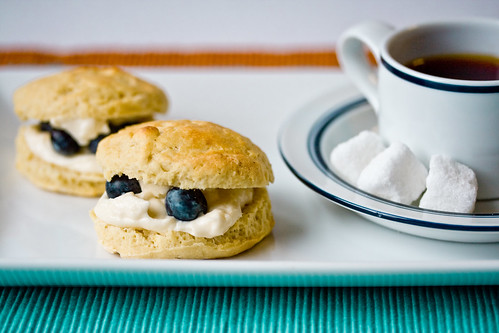
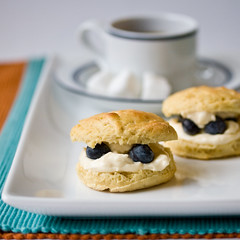
Usually scones are served with strawberry jam. I decided to go with fresh, organic blueberries because I had them on hand, but any fresh berry or your favorite jam will be perfect for these. They’re really quick to throw together, so it really is a nice thing to make fresh for afternoon tea or a nice weekend breakfast. They’re best served warm, but I hear you can freeze them if needed.
These scones are very lightly flavored. I love the combination of lemon and maple, but since I was trying to emulate British scones, the flavoring is delicate. They’re good on their own, but spectacular with the clotted cream and berries. Does the vegan clotted cream tase anything like the real stuff? I have no idea, but my best guess is no. But even if it’s not the same, it’s really, really tasty.
Lemon Maple Scones with Clotted Cream
Makes 12-15 2″ Scones
2 Cups All- Purpose Flour
2 1/2 tsp Baking Powder
1/2 tsp Salt
Zest of 1 Lemon
1/3 Cup Earth Balance Margarine
3 Tbs Maple Syrup (or regular sugar)
1/2 Cup Soymilk
2 Tbs Lemon Juice
Clotted Cream
4 Tbs Earth Balance Margarine
4 Tbs Tofutti Better Than Cream Cheese
2 Tbs Powdered Sugar
Whisk the ingredients for the clotted cream together. It takes some elbow grease, but it will soon be a thick, smooth cream. Let it sit out to soften a little if needed to ease mixing. Set aside at room temperature; refrigerating will make the cream stiffer.
Preheat oven to 400º F.
Whisk all the dry ingredients together in a mixing bowl (flour through zest). Mix the wet ingredients together (syrup, soymilk and lemon juice). Using a pastry cutter or a fork, blend the Earth Balance into the dry ingredients until there are no chunks of margarine left and the mixture looks like damp sand.
Pour in the wet ingredients and mix with your hands to form a soft dough. Only mix until just combined, adding more flour if the mixture is too wet. Turn out the dough onto a floured surface and roll out to a slab 3/4″ thick. Using a biscuit cutter or a glass with about a 2″ diameter, cut out your scones. Press the scraps of dough together, roll out again, and continue cutting scones until you’ve used up your dough.

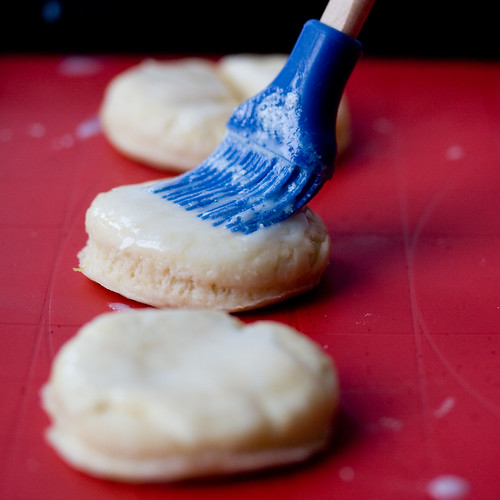
Transfer scones to a cookie sheet covered in parchment paper, or a non-stick mat. Brush the tops with a mixture of soymilk, powdered sugar and lemon juice.
Bake at 400º F for 12-15 minutes. If the scones aren’t lightly brown after 15 minutes, transfer to the broiler for 1-2 minutes, watching carefully, to brown the tops if desired. Remove to a cooling rack.
While still warm, split and slather each side with clotted cream. Add berries or jam to the top and serve with your favorite tea.