Peach Upside-Down Cake & How to Cut Ripe Peaches
I saw this cake on FatFree Vegan Kitchen a few days ago, and I was devastated. I had, the night before, sat down and eaten every peach I had because they were all ripe and I hadn’t come up with a plan for them fast enough. Peaches and pears, the most elusively ripening fruits in the universe! “Not yet not yet not yet not yet not yet NOW! Too late!”
 So I sliced them all up, divided them between two bowls and my husband and I ate them in one sitting. Now, it’s not that I didn’t enjoy them just as they were, unblemished, sweet and juicy. But when I read Susan’s post the next day, my heart sank. I wanted that cake! I wanted it right then!
Thankfully few days later I got another round of peaches from our CSA. And then a miracle happened – the ripened to perfection on the coolest day we’ve had in a long while. Why, it was downright chilly today! I could actually use the oven! The gods of ripened fruit had smiled upon me, and I was going to have my cake!
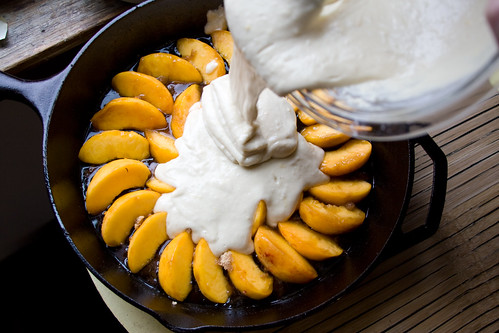
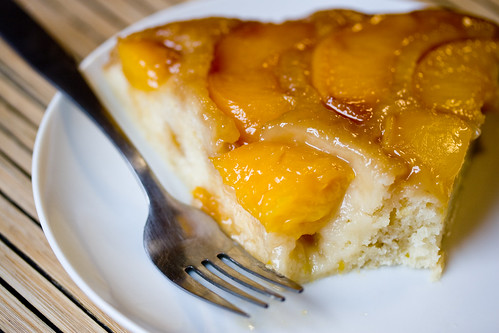
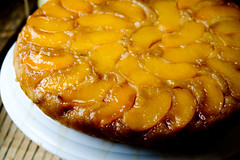 This sounds like the set up for bad news, but I assure you, there is no bad news. The cake is delicious. And the recipe is easy. I made it as Susan wrote it (with the optional added sugar, because I apparently am just begging for adult onset diabetes) and it worked out great! I think next time I will add some dollops of earth balance over the peaches to balance the sugary glaze with a savory note, but I’m seriously nit-picking here. This is a gem of a cake. You need to make it!
I discovered last week, however, that peeling a ripe peach can be a messy process. The darn things are downright unforgiving if you mishandle them. They will turn to mush in your hands, leaving you with a pile of glop roughly assembled around a pit. Granted, it’s a tasty pile of glop, but it’s glop nevertheless.
I know everyone says blanching peaches is the way to go. The skins come right off and all is well in the world. But I don’t want to blanch my peaches! I apparently cannot be troubled to boil water. It is a pain in the butt, right? For peaches? I don’t want to cook them, I want to eat them. Below is a tutorial for those of you who desire pretty peach slices without blanching. Now you have no excuse not to make Susan’s cake!
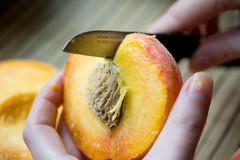
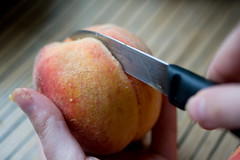 Begin by using a small, sharp paring knife to cut along the peach’s natural divide. Insert the knife until you feel the pit, then move the peach around the knife (not the other way around!) until you have a clean cut dividing the peach.
 Place your thumbs were the stem of the peach was and gently pry the two halves apart. If your peach is overripe, you may have some trouble here, as the force you need to use will crush the peach before it separates it. Take your time if this happens, but just ripe peaches will separate fine
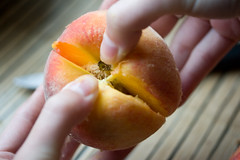
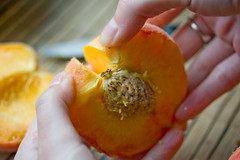
 Now you have the two halves, one side containing the pit. This isn’t really a step, I just like adding in photos for no reason, apparently. Sometimes you can pry the pit out with your fingers at this step, but some peaches won’t let you win that easy. You might need loosen it a little more before you try, as shown in the next step.
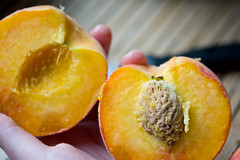
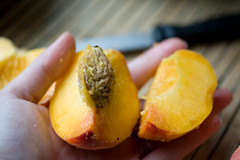
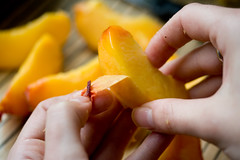
 Cut the pit-side in half, running your knife up along the pit. With really ripe peaches, you need to be careful even holding them. I definitely have accidently made thumb prints in the sides of what was otherwise a totally unblemished peach simply because I grasped it too roughly.
 Now you should be able to pry these to halves apart. Again, be gentle.
You’re almost done. Try separating it from the other end if it begins to get mushy on you. Also, don’t lick the peach juice off your hands in front of guests!
 Remove the pit and toss it. Or, you know, don’t toss it. Collect them and play games with them. The more adventurous among you can carve them into the likeness of Abe Lincoln. I’m not kidding.
I wouldn’t mind a peach pit ring. I’m a size 5.
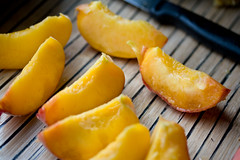 Now cut the peach pieces you have so you have eight even slices.
 The slices will be small enough that you can easily peel the skin off with your fingers. I’ve tried peeling the skin from larger slices, and it just doesn’t work.
Now all you have to do is make that cake!