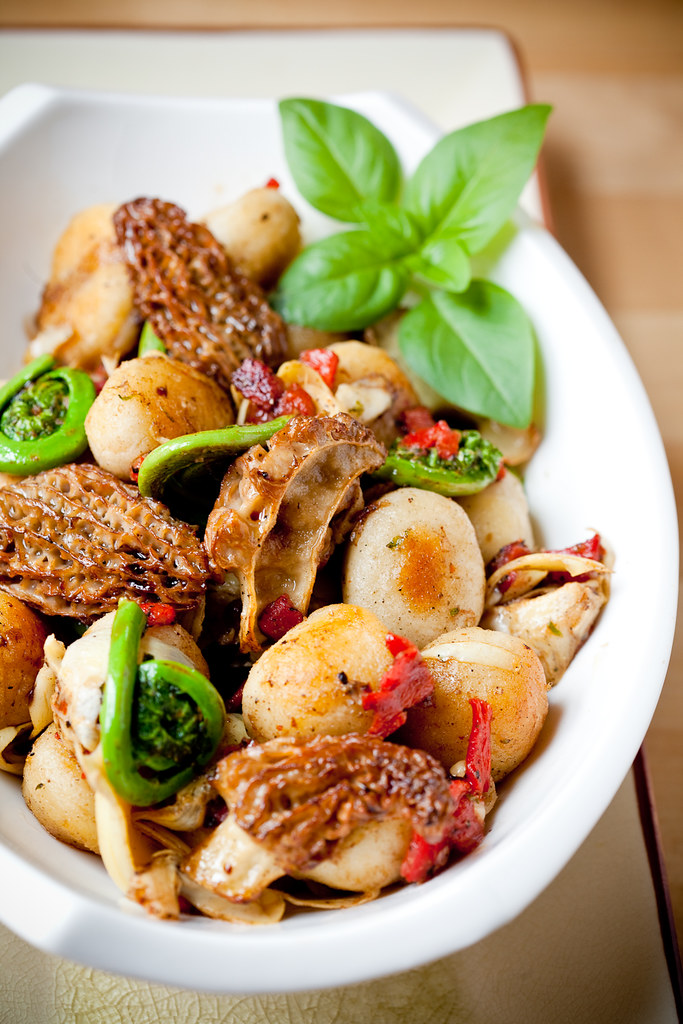
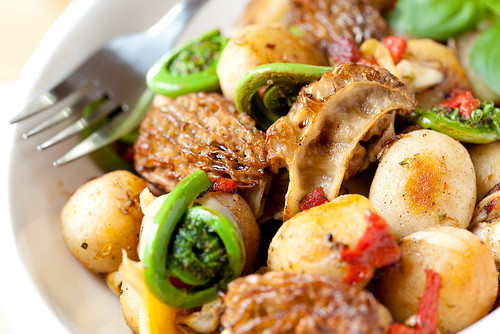
Pan-Fried Gnocchi with Morels and Fiddleheads
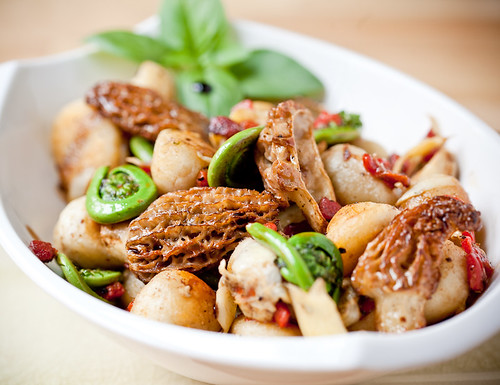
Spring is here, and it brings with it two of my most favorite seasonal items: morels and fiddlehead ferns. At $28/lb here in Boston, fresh morels are definitely a splurge. But you only need to pick up a few to have them in this dish, and it’s well worth it to do so.
If you live in the right area, you can try your luck at finding your own in the woods right now, but as with all foraging, make sure you have the right mushroom before you eat it. It’s best to go with someone who knows what they are doing, but the locations where wild morels grow are usually carefully guarded secrets, considering the price they’ll fetch at markets. It’s easier and safer to pony-up some cash at Whole Foods, even though it’s not as adventurous.

Fiddlehead ferns are lovely. Not only are they in season at the same time morels are, they also pair really well with them. You can read a little informational post I wrote about them here. I love their tender crunch, mild flavor, and beautiful swirl. And just like morels, use them as soon as you can, they don’t store well.
The hardest part of this dish is definitely finding the morels and the fiddleheads. After that, it’s cake! I used a pre-packaged fresh gnocchi (gluten free, too!) and further simplified it by pan-frying them instead of boiling them. Boiling is easy; pan-frying is even easier, not to mention faster. You can cook up the gnocchi faster than the time it takes to boil a pot of water. Pan-frying the gnocchi gives them a wonderful color and texture. If you’ve never tried it before, you definitely should!
All the other ingredients are quick sauteed, so this makes a really delicious, fast, and easy meal with practically no fuss. And if you can’t find morels and fiddleheads, I encourage you to try the dish anyway with asparagus tips and your favorite mushroom.
Pan-Fried Gnocchi with Morels and Fiddleheads
Serves one filling meal, or two very light meals
2 Tbs Olive Oil, give or take
1 9-oz Package Fresh Gnocchi
3-5 Fresh Morels, halved (sub any wild mushroom)
1/3 Cup Fresh Fiddlehead Ferns, washed and dried (sub asparagus tips)
1/4 Cup Roasted Red Pepper, diced
2-3 Canned Water-Packed Artichoke Hearts, sliced
1/8 tsp Salt, plus more for seasoning
Fresh Black Pepper
Slice your morels in half and inspect them carefully for dirt and critters. Since morels are foraged for in the wild, they sometimes have surprises hiding inside. Just saying.
Heat a well-seasoned cast-iron skillet or non-stick pan over medium high heat. Add halved morels and a teaspoon or so of oil. Saute until golden brown, 2-3 minutes, adding a pinch of salt. Set aside.
Add the ferns, roasted pepper, and artichoke hearts to the pan, with a teaspoon or so more oil if needed. Add 1/8 tsp salt to season. Saute for 2-3 minutes until tender and the artichoke hearts and ferns are beginning to color. Remove from pan and set aside.
While the pan is still hot (medium-high heat), add the raw gnocchi and enough oil to coat well. Cook for 3-4 minutes until golden brown on all sides and slightly puffy. Once cooked through, add the fern/artichoke/pepper mixture back to the pan and toss gently until well combined. Season with more salt and pepper if needed.
Plate, adding the cooked morel mushrooms to the top before serving.